Introduction of Fiber Splice Tray

Fiber splice tray is designed to provide a place to store the fiber cables and splices and prevent them from becoming damaged or being misplaced. It is also called as splice enclosure or splice organizer. This device does not contain any technical functions, and the design is simple. Also, it has a very low price for people to afford. However, the importance of fiber splice tray for protecting fibers is significant. And the skills needed for using fiber splice tray is not as simple as you think.

Function of Fiber Splice Tray

With such a simple structure, you may wonder how the fiber splice tray actually works. Here is the brief introduction of its working function: The incoming cable is brought into the splicing center where the outside jacket of the cable is stripped away. The fibers are then looped completely around the tray and into a splice holder. Different holders are available for different types of splices. The fibers are then spliced onto the outgoing cable if it is an intermediate point or on to pigtails if it is a termination point. These are also looped completely around the tray and then fed out of the tray.

Installation Procedures

The installation procedures can be divided into five steps:

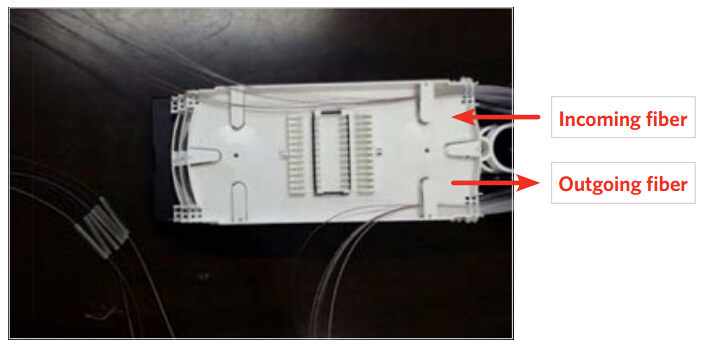
Step one, route fibers into splice tray using spiral transportation or fiber furcation tubes and secure with cable ties.

Splice-Tray-Installation-Step-One

Step two, splice fibers per local practice.

Splice-Tray-Installation-Step-Two

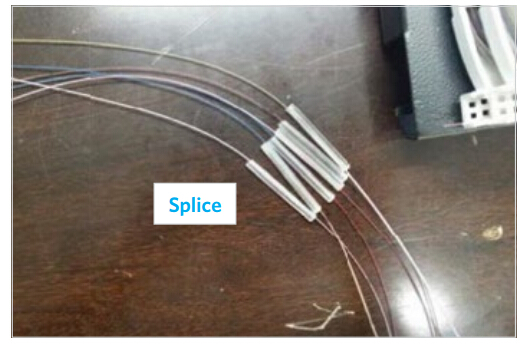
Step three, place spliced fibers into the sleeve holders arranged by color code.

Splice-Tray-Installation-Step-Three

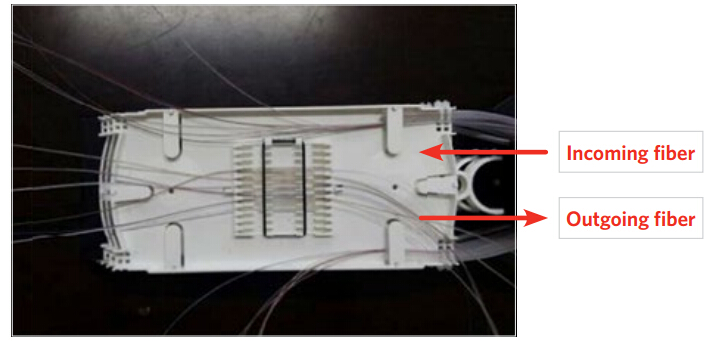
Step four, carefully coil the outgoing fiber slack into the tray (coil 1).

Splice-Tray-Installation-Step-Four

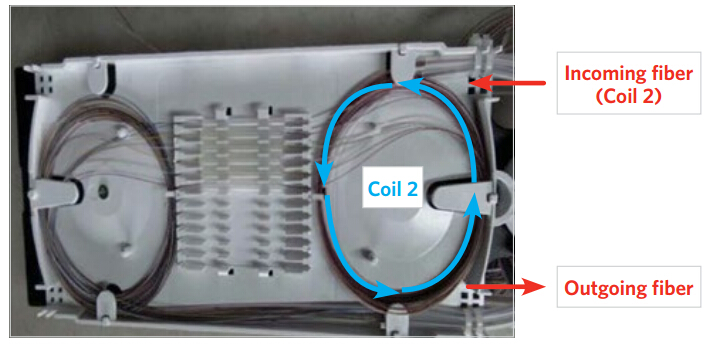
Step five, carefully coil incoming fiber slack into the tray (coil 2).

Splice-Tray-Installation-Step-Five

Applications

Fiber splice trays are usually placed in the middle of a route where cables are required to be joined or at the termination and patch panel points at the end of the cable runs. Also, splices can be placed in a splice tray which is then placed inside a splice closure for OSP (outside plant) installations or a patch panel box for premises applications. As for indoor application, fiber splice trays are often integrated into patch panels to provide for connections to the fibers.

Conclusion

As a protection for fiber splices, fiber splice tray is no doubt the most cost-effective device. This simple design solves a lot of problems during fiber cables installation. Fiberstore provides different shaped splice trays with different fiber capacities in a competitive price. If you are interested, FS.COM is a good place to go.

How to Terminate Fiber Optic Cables?

Since the late 1970s, various connectors and termination methods have been brought to market. Now in the common case, cables are terminated in two ways: use connectors to make two fibers jointed or to connect the fiber to other network gears; use splices to make a permanent joint between two fibers. And for the former method, you may have little confusions to deal with it. So today this paper will teach you how to terminate by taking an example of fiber optic cable using epoxy.

First and foremost, use a proper fiber stripper to carefully slide the jacket off of the fiber to a bare fiber. When you are doing this, be careful that try to avoid breaking the fragile glass fiber. After that, mix the epoxy resin and hardener together and load it into a syringe (If you use the pre-loaded epoxy syringes that are premixed and kept frozen until use, then you don’t do that). And next you must inject the epoxy from the syringe directly into the connector ferrule.

Fiber Stripping Tool

Once you have well prepared the epoxy for your connector, you can insert the fiber cable gently into the terminus inside the connector wall and make the bare fiber core stick out about a half an inch from the front of the ferrule. In the case that your cable is jacketed, you may need a crimping tool, such as Sunkit Modular Crimping Tool, to secure the connector to the jacket and strength the cables. Usually two crimp tools would be perfect to this operation.

Next, you can just wait the epoxy to cure. During this process, in order to make sure the end of the fiber is not damaged while curing, you should place the connected end in a curing holder. And when this is done, just place the cable and curing holder into a curing oven. But you may worry about “wicking” while curing with a conventional oven. All you have to do to avoid that is to make the end face down, which can ensure the epoxy does not come out of the back side of the connector and compromise the strength member of the cable. Remember: your epoxy curing must in accurate times and temperatures.

After the epoxy cured sufficiently, fiber cleaver tools will be in use to cleave the excess protruding fiber core so that it could make the fiber close as much as possible to the ferrule tip in case of fiber twisting. Once cleaved, you have to dispose of the fiber clipping. There is a point you should think highly of that you must use a regular piece of tape to retain your fiber debris, or they will easily end up in your skin or even in your eyes or respiratory system.

High Precision Fiber Optic Cleaver

When you finished the fiber cleaved work, you could need fiber polishing tool to remove the excess epoxy from the ferrule tip and buff out any imperfections on the surface of the fiber. A smooth fiber surface can help to reduce the loss of the light. Last, if you have done all the above work, you may move on to the cleaning of the ferrule and fiber tip. After that, the whole termination procedure is done.

If you want to terminate your fiber optic cables by hands, you can follow the above steps. But before you get down to it, you must prepare the tools first that I have mentioned in this paper. All these tools can be found in Fiberstore with good quality and low price. In addition, Fiberstore also can provide the termination tool kits that may be helpful to you. For more details, you could visit www.fs.com.

Article source: http://www.chinacablesbuy.com/how-to-terminate-fiber-optic-cables.html