
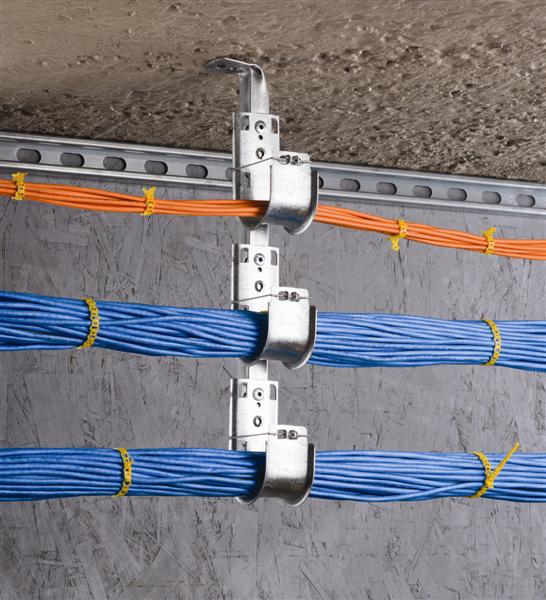
When managing large amount of fiber cables, using a cabling pathway is very useful to provide better support for the cables. Common pathway systems are usually structured with conduits, cable trays, ladder racks, surface raceways, and underfloor ducting systems. Construction materials can be made of steel, aluminum, fiber glass or plastic. However, it is not that necessary to lay every inch of cable on top of a support element. Lots of pathway materials can be saved for other important applications. Is there any solution can both save the construction material and provide continuous support for the cables? The answer is yes. J-hook system perfectly solves the issue with greater flexibility and simpler installation. This article is going to present some basic information about J-hook.
The name comes from its side view of the letter “J” with a semi-circular bottom section. Cables can be put in the rounded gaps between J-hooks for a continuous support. J-hook is also designed with smooth beveled edges which provides a large bending radius for fiber cable. It is widely used for indoor and outdoor applications providing a speedy and easy installation.
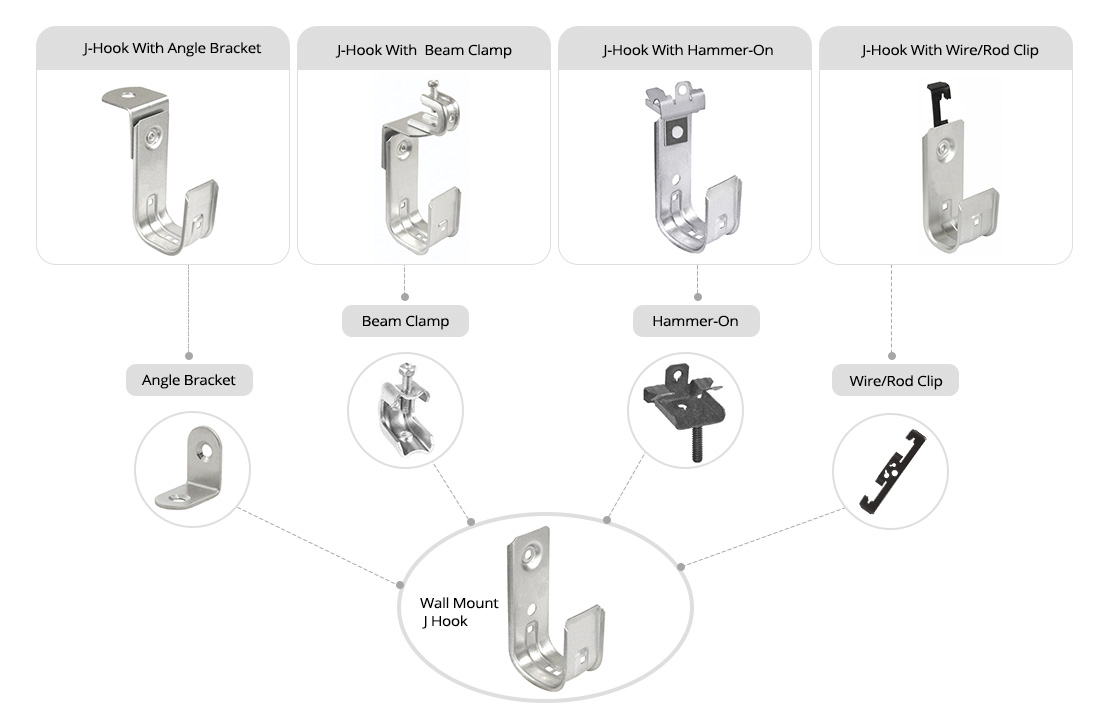
J-hook can be fitted with many kinds of attachments allowing for a more flexible use. The followings are some common fitting types for wall-mount J-hook.
Using the 90-degree angle bracket, J-hook can be fastened onto the ceiling. It is also an effective solution for cable trays. This attachment can be easily installed or removed as you want.
This attachment can install J-hook to the horizontal flanges with the knock-on beam clamp. It allows for up to 1/8 inch flange thickness. In addition, J-hook with beam clamp is able to rotate 360 degrees to support all directional cable runs.
Hammer-on clip attachment fitting can be quickly installed with only a hammer. It is also able to swivel 360 degrees for various directional runs of cable.
Wire/rod clip is also known as bat wing clip due to its bat shape. It attaches the J-hook to a wide variety of structures. The clip can snap onto the wire that holds up ceiling grids, thus the cable can be suspended at any position in a plenum space.
- Step 1, fasten J-hook with the right attachment. It depends on where the J-hook is located. Wall, stud, beam, flange and drop-wire mounting are the common supporting structures.
- Step 2, align snap lock attachment of J-hook with holes of the chosen bracket and snap J-hook into position.
- Step 3, lay the cable in J-hooks. The intervals between J-hooks is around 1.2 to 1.5 m.
- Step 4, look over your installation to ensure the cables are neatly laid on the J-hooks.
Compared with traditional pathway elements, J-hook is easier to install and move on-site without the need for special tools. A variety of attachment types enable the flexibility of J-hook to be placed at different locations. There is more headroom capability when using J-hooks. Its wide-base design also maintains the bend radius of large diameter cables.
J-hook is absolutely a simpler solution for horizontal cabling support. Different from other continuous support systems, J-hook system is more economical with fewer logistical demands, less installation labor and reduced material cost. Since it can be used in multiple environments and applications, more and more cabling projects have been adopting J-hook system for construction.